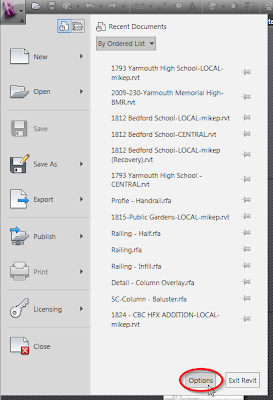
Step 1 - Open up Revit and click on the big "R" in the upper left hand corner. Then click on the "Options"
button. See the image to the right. You do not need to have a project open to follow along.
Step 2 - Once the dialog box opens, click the "User Interface" tab at the top and choose "Keyboard Shortcuts: Customize" just below.

Step 3 - In the lower left hand corner of the Keyboard Shortcuts dialog box that just opened you will see a button called "Import". Go ahead and click on it and browse to "S:\WHW BIM\Support\2013 Support\Keyboard Shortcuts". Choose the "WHW Keyboard Shortcuts 2013.xml" file and then click "Open".
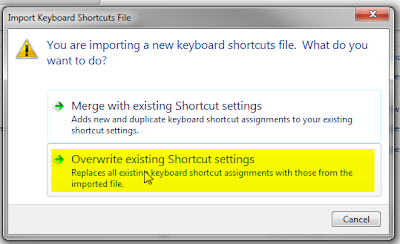
Step 4 - Revit will present you with a few options. You want to choose "Overwrite existing Shortcut settings". Finally, click "OK" twice and you are ready to go.
You are probably wondering how you find out what all these wonderful shortcuts are. Head on over to the post on Revit Keyboard Shortcuts & You to find out more.
If you are interested in editing your own keyboard shortcuts, see the video tutorial below for a great synopses on how to do so. Always make sure to save a backup of the shortcuts you made using the "Export" button.
No comments:
Post a Comment