Wednesday, October 19, 2011

Moving Elevations, Sections & Callouts in Revit


Please be careful when moving elevation, section & callout tags in Revit. If a user is not paying attention, they could possibly move all of the detail items (lines, detail components, filled regions, etc.) in a view so they are no longer in alignment with the model.

The problem comes when a tag referencing a view is dragged or moved in a direction not perpendicular to view. In these cases Revit moves the linework long with the moved view. For example, if I move a wall section 300mm away from a wall using the move command, the detail items in that view will seem to move the same 300mm away from the model.


Moving a wall section parallel to the view...


...can cause detail items in that view to move as well


A single click on a tag will provide you with little blue hotpoints. Think of these hotpoints as your friends. Whenever possible you will want to change the appearance of your view with these hotpoints. This will ensure that no detail items are moved within the view relative to the model. Elevations and sections do not have a hopoint to move them perpendicular to a view, only parallel. Say for instance you need to move a wall section tag further down along a wall. If you use the move command and make sure you stay perpendicular to the view, everything will be peachy. Just be sure never to drag a tag as you can never make sure that you are staying perpendicular.


One closing note. If you ever click on a view tag and don't see any hotpoints show up, check to see if the section has been pinned in place. A simple unpin and you will see all of the options restored.

Friday, August 5, 2011

Missing Flamingo


MISSING

Flamingo last seen in the vicinity of Mike's desk. He is pink with an yellow and black bill and would stand 14" high if his legs were not viciously removed and left behind. Answers to the name Martini.


REWARD IF FOUND

Tuesday, August 2, 2011

Groceries, Goats and More!!

Everyone who is enjoying the TapRoot Farms weekly delivery can attest to the deliciousness of eating seasonally and local food.

I'm excited to announce expanding, locally produced food options! A friend of mine is starting to do a small scale home-made Bread delivery!

The cost is $4/loaf, including delivery.
He is primarily baking Sourdough, but he does take special requests, including gluten-free.

This source is not part of the TapRoot delivery, and is open to everyone. If you're interested, let me know and I will organize to have the delivery arrive at the same time/day as the TapRoot boxes (Tuesdays between 3:30 and 4 pm).

Because this is a new service, I would recommend that anyone interested participate in a one week trial, and we can see what we all think from there, if we want to continue.

Also, if you have any questions/requests, pass those through me and I'll find out asap.

Thursday, July 14, 2011

Lock Down Your Grids

I recently read about a new way to lock down grids in a Revit model that is effective and easy to implement. Jason Grant details a method using design options to secure the grids in a post on his Revit blog.

Basically you just create a new design option set called "Grids" with a single primary option. Then simply place the grids in this design option and you are done. This way you can't accidentally move a grid without consciously activating the option. Safe and secure while still easy to edit. I'll be testing it out soon on a project near you.

Wednesday, July 13, 2011

Revit View Range Explained

Dave recently pointed out a great post on therevitkid.com showing a great explaination of how View Range works in Revit with a nice, clear handout.

See the original post here.

Thursday, June 16, 2011

Revit Keyboard Shortcuts & You


The fastest way to boost your productivity with Revit is to start getting away from the cumbersome ribbon and break out the keyboard shortcuts.

How do you know what those shortcuts are?

I have created a comprehensive list of shortcuts in a cute little PDF. See the link below. If you would like to print it out, make sure that you choose doub
le sided to keep things on a single sheet. You will notice that there are actually two different lists in this PDF. The first is sorted by ribbon the way the commands display in Revit. The other is alphabetical. Feel free to use one or both depending on how you work best. Make sure that you have the most up-to-date shortcuts loaded into Revit. See the post on How to Load Revit Keyboard Shortcuts for more information.


Remember that you can always find out what a shortcut is directly in Revit by hovering over the command in the ribbon and waiting for the tooltip to display. The current shortcut will display in parenthesis to the right of the command name.


How To Load Revit Keyboard Shortcuts

We will be going through a step by step tutorial on how to make sure you have the latest keyboard shortcuts loaded into Revit. Warning!!! If you have manually changed your own shortcuts, realize that proceeding will overwrite those settings.

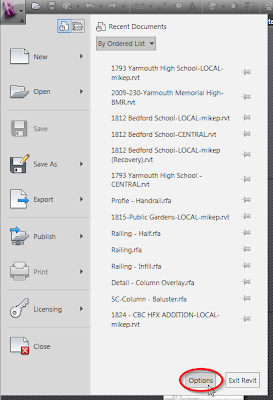
Step 1 - Open up Revit and click on the big "R" in the upper left hand corner. Then click on the "Options"
button. See the image to the right. You do not need to have a project open to follow along.


Step 2 - Once the dialog box opens, click the "User Interface" tab at the top and choose "Keyboard Shortcuts: Customize" just below.


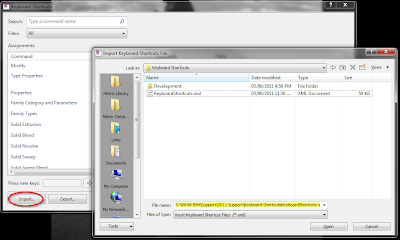
Step 3 - In the lower left hand corner of the Keyboard Shortcuts dialog box that just opened you will see a button called "Import". Go ahead and click on it and browse to "S:\WHW BIM\Support\2013 Support\Keyboard Shortcuts". Choose the "WHW Keyboard Shortcuts 2013.xml" file and then click "Open".


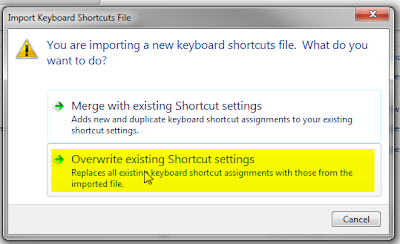
Step 4 - Revit will present you with a few options. You want to choose "Overwrite existing Shortcut settings". Finally, click "OK" twice and you are ready to go.


You are probably wondering how you find out what all these wonderful shortcuts are. Head on over to the post on Revit Keyboard Shortcuts & You to find out more.

If you are interested in editing your own keyboard shortcuts, see the video tutorial below for a great synopses on how to do so. Always make sure to save a backup of the shortcuts you made using the "Export" button.