Showing posts with label revit. Show all posts

Thursday, January 19, 2012

DWF Commenting & Revit

DWFs, if you haven't heard of them, are Autodesk's answer to PDFs.  They are a way to digitally publish your drawings in a format that is optimized for CAD and BIM output.  The best part is that anyone with a computer (or and iPad) can view, comment and even take dimensions and areas from your drawings for free using Autodesk Design Review software. 


One of the nicest features of DWFs is that any comments done on the file in Design Review can be loaded right into the same view or sheet in Revit.  This means that a project manager with no knowledge of Revit can go and mark-up a full set of drawings.  The team can then load the comments directly into the project in Revit. The video below will give you a better idea of the workflow.  And no, that is not my accent.


Basically, the way I see this working is as follows:
  1. One person on the team is charged with making a DWF set of the documents to the same location daily before he or she leaves for the day.
  2. Project managers can at any time go to where they know the current DWF of the drawings will be.  If they have any comments to add, they can save the DWF with a new name, make their comments and inform the team of the new DWF.
  3. The team will then load the DWF comments into Revit.  In Revit they can make the necessary changes and update the DWF comment status.  When they save the project, Revit will automatically save the DWF comments and the project manager can go back at any time and verify the comments were picked up.
Try this out on your next project and let me know how it goes.  We could even be sending DWFs directly to clients for review and commenting in Design Review. 

Wondering if you have Autodesk Design Center on your computer?  Go to "Start > All Programs > Autodesk" and look for "Autodesk Design Review 2012".  If it isn't there just email support and ask to have it installed.

Happy Commenting.

Revit AutoCaps & New Shortcuts

There is a new little program that will soon be coming to a project near you.  Basically when you run the shortcut script for your project a small program will get started along with the workshare monitor.  The program adds a sort of "autocaps" feature to Revit as well as adds a few shortcuts you can't add in the default keyboard settings.  You will know it is running when you see the little orange WHW icon (see the image below) show up in your task manager.


Basically the program acts like autocaps in Autocad.  It senses when you are in a text field or a schedule in Revit and automatically turns on caps lock.   Because you may not always want caps lock to be on in schedules, you can turn it off by right clicking the icon and de-checking "Caps In Schedule".  The program adds a few other features such as a shortcut for saveas.  Click on "Help" in the same menu for more information.

I'm looking for beta testers if anyone is interested and doesn't mind a few glitches.  If this is you, lync me or shoot me an email.  Things are pretty solid right now, but you never know.

Monday, October 31, 2011

Overriding Linked Revit Models

When in the "Revit Links" section of the Viability/Graphics dialog box you may have noticed that there are little plus signs at the beginning of all the linked in models. When you expand the section, a line will appear, or possibly several, typically titled with a number. This number refers to the specific instance of the linked in model in your project. Say you were working on a series of condo buildings that were all exactly the same. Several instances of the same condo model may be linked into a shared site model. Revit gives you the ability to control these separate instances individually. However, most of the time this just gets in the way as we typically have only one instance loaded. For most project this would be a single instance of the structural model.

The problem comes in when the expanded instance gets overridden and not the top level link. The instance override will always take precedence and a user coming in later trying to change the visibility of the link from the top level will get confused when none of their changes take effect.


Basically, the expanded instance should always read "Not Overridden" in the "Display Setting" column unless you have a really good reason to have it set otherwise. If the text reads something else, that means the settings have been manually changed. If you would like to change them back, go to the "Display Settings" section for the instance and de-check the box for "Override display settings for this instance". You will then see any changes made at the top level take effect on your view.


Monday, October 24, 2011

Window Selection Warning


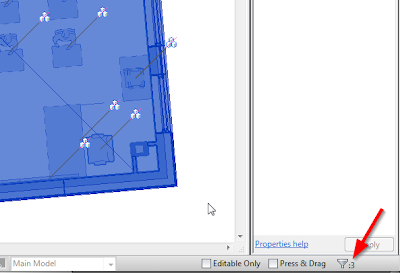
Revit has a few quirks in which a seemingly small action can have a large ramification on the entire model. One of these actions is selecting objects using a window. Just like in Autocad, Revit will select all objects that touch a window when drawn from right to left. This includes items that you typically don't want to change like a linked in structural model. Whenever selecting with a window, immediately check the lower right hand corner to find out the total number of items selected.


If that number at all differs from the number of items you wanted selected or if you are at all unsure of what the number should be, click the little filter icon next to the number. This will bring up the selection filter dialog box and provide a full list of the items in the current selection set.

From here, simply uncheck any unwanted object types and continue on with your operation. In this case I will de-select the line for RVT Links and feel confident that the only object that is going to get edited is the object I intended.

Please select responsibly. Your fellow Revit users will thank you.

Wednesday, October 19, 2011

Moving Elevations, Sections & Callouts in Revit


Please be careful when moving elevation, section & callout tags in Revit. If a user is not paying attention, they could possibly move all of the detail items (lines, detail components, filled regions, etc.) in a view so they are no longer in alignment with the model.

The problem comes when a tag referencing a view is dragged or moved in a direction not perpendicular to view. In these cases Revit moves the linework long with the moved view. For example, if I move a wall section 300mm away from a wall using the move command, the detail items in that view will seem to move the same 300mm away from the model.


Moving a wall section parallel to the view...


...can cause detail items in that view to move as well


A single click on a tag will provide you with little blue hotpoints. Think of these hotpoints as your friends. Whenever possible you will want to change the appearance of your view with these hotpoints. This will ensure that no detail items are moved within the view relative to the model. Elevations and sections do not have a hopoint to move them perpendicular to a view, only parallel. Say for instance you need to move a wall section tag further down along a wall. If you use the move command and make sure you stay perpendicular to the view, everything will be peachy. Just be sure never to drag a tag as you can never make sure that you are staying perpendicular.


One closing note. If you ever click on a view tag and don't see any hotpoints show up, check to see if the section has been pinned in place. A simple unpin and you will see all of the options restored.

Thursday, July 14, 2011

Lock Down Your Grids

I recently read about a new way to lock down grids in a Revit model that is effective and easy to implement. Jason Grant details a method using design options to secure the grids in a post on his Revit blog.

Basically you just create a new design option set called "Grids" with a single primary option. Then simply place the grids in this design option and you are done. This way you can't accidentally move a grid without consciously activating the option. Safe and secure while still easy to edit. I'll be testing it out soon on a project near you.

Wednesday, July 13, 2011

Revit View Range Explained

Dave recently pointed out a great post on therevitkid.com showing a great explaination of how View Range works in Revit with a nice, clear handout.

See the original post here.

Thursday, June 16, 2011

Revit Keyboard Shortcuts & You


The fastest way to boost your productivity with Revit is to start getting away from the cumbersome ribbon and break out the keyboard shortcuts.

How do you know what those shortcuts are?

I have created a comprehensive list of shortcuts in a cute little PDF. See the link below. If you would like to print it out, make sure that you choose doub
le sided to keep things on a single sheet. You will notice that there are actually two different lists in this PDF. The first is sorted by ribbon the way the commands display in Revit. The other is alphabetical. Feel free to use one or both depending on how you work best. Make sure that you have the most up-to-date shortcuts loaded into Revit. See the post on How to Load Revit Keyboard Shortcuts for more information.


Remember that you can always find out what a shortcut is directly in Revit by hovering over the command in the ribbon and waiting for the tooltip to display. The current shortcut will display in parenthesis to the right of the command name.


How To Load Revit Keyboard Shortcuts

We will be going through a step by step tutorial on how to make sure you have the latest keyboard shortcuts loaded into Revit. Warning!!! If you have manually changed your own shortcuts, realize that proceeding will overwrite those settings.

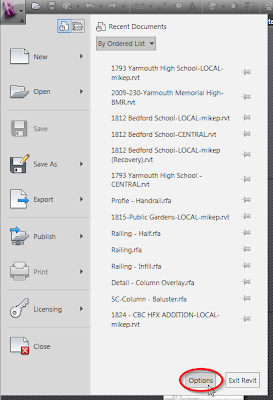
Step 1 - Open up Revit and click on the big "R" in the upper left hand corner. Then click on the "Options"
button. See the image to the right. You do not need to have a project open to follow along.


Step 2 - Once the dialog box opens, click the "User Interface" tab at the top and choose "Keyboard Shortcuts: Customize" just below.


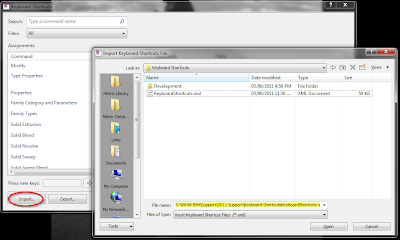
Step 3 - In the lower left hand corner of the Keyboard Shortcuts dialog box that just opened you will see a button called "Import". Go ahead and click on it and browse to "S:\WHW BIM\Support\2013 Support\Keyboard Shortcuts". Choose the "WHW Keyboard Shortcuts 2013.xml" file and then click "Open".


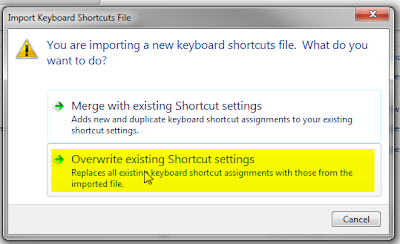
Step 4 - Revit will present you with a few options. You want to choose "Overwrite existing Shortcut settings". Finally, click "OK" twice and you are ready to go.


You are probably wondering how you find out what all these wonderful shortcuts are. Head on over to the post on Revit Keyboard Shortcuts & You to find out more.

If you are interested in editing your own keyboard shortcuts, see the video tutorial below for a great synopses on how to do so. Always make sure to save a backup of the shortcuts you made using the "Export" button.