Monday, October 31, 2011

Overriding Linked Revit Models

When in the "Revit Links" section of the Viability/Graphics dialog box you may have noticed that there are little plus signs at the beginning of all the linked in models. When you expand the section, a line will appear, or possibly several, typically titled with a number. This number refers to the specific instance of the linked in model in your project. Say you were working on a series of condo buildings that were all exactly the same. Several instances of the same condo model may be linked into a shared site model. Revit gives you the ability to control these separate instances individually. However, most of the time this just gets in the way as we typically have only one instance loaded. For most project this would be a single instance of the structural model.

The problem comes in when the expanded instance gets overridden and not the top level link. The instance override will always take precedence and a user coming in later trying to change the visibility of the link from the top level will get confused when none of their changes take effect.


Basically, the expanded instance should always read "Not Overridden" in the "Display Setting" column unless you have a really good reason to have it set otherwise. If the text reads something else, that means the settings have been manually changed. If you would like to change them back, go to the "Display Settings" section for the instance and de-check the box for "Override display settings for this instance". You will then see any changes made at the top level take effect on your view.


Monday, October 24, 2011

Window Selection Warning


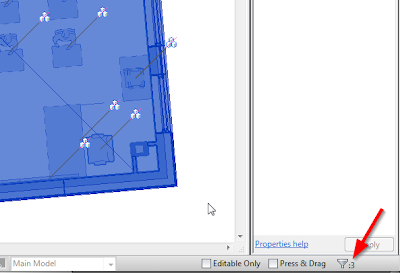
Revit has a few quirks in which a seemingly small action can have a large ramification on the entire model. One of these actions is selecting objects using a window. Just like in Autocad, Revit will select all objects that touch a window when drawn from right to left. This includes items that you typically don't want to change like a linked in structural model. Whenever selecting with a window, immediately check the lower right hand corner to find out the total number of items selected.


If that number at all differs from the number of items you wanted selected or if you are at all unsure of what the number should be, click the little filter icon next to the number. This will bring up the selection filter dialog box and provide a full list of the items in the current selection set.

From here, simply uncheck any unwanted object types and continue on with your operation. In this case I will de-select the line for RVT Links and feel confident that the only object that is going to get edited is the object I intended.

Please select responsibly. Your fellow Revit users will thank you.

Wednesday, October 19, 2011

Moving Elevations, Sections & Callouts in Revit


Please be careful when moving elevation, section & callout tags in Revit. If a user is not paying attention, they could possibly move all of the detail items (lines, detail components, filled regions, etc.) in a view so they are no longer in alignment with the model.

The problem comes when a tag referencing a view is dragged or moved in a direction not perpendicular to view. In these cases Revit moves the linework long with the moved view. For example, if I move a wall section 300mm away from a wall using the move command, the detail items in that view will seem to move the same 300mm away from the model.


Moving a wall section parallel to the view...


...can cause detail items in that view to move as well


A single click on a tag will provide you with little blue hotpoints. Think of these hotpoints as your friends. Whenever possible you will want to change the appearance of your view with these hotpoints. This will ensure that no detail items are moved within the view relative to the model. Elevations and sections do not have a hopoint to move them perpendicular to a view, only parallel. Say for instance you need to move a wall section tag further down along a wall. If you use the move command and make sure you stay perpendicular to the view, everything will be peachy. Just be sure never to drag a tag as you can never make sure that you are staying perpendicular.


One closing note. If you ever click on a view tag and don't see any hotpoints show up, check to see if the section has been pinned in place. A simple unpin and you will see all of the options restored.